Genesys Cloud
Callbacks and appointments
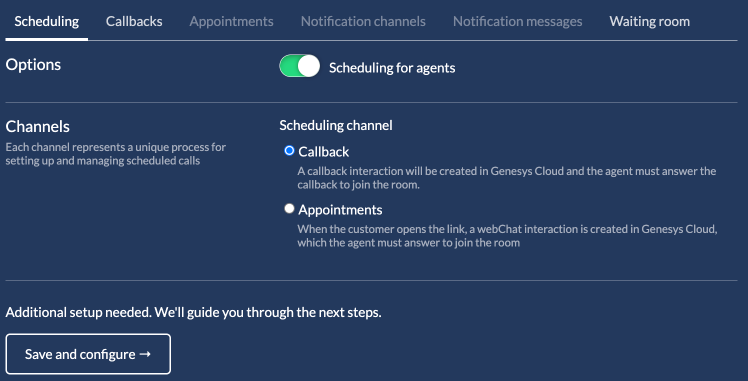
Previously, scheduling a video call in Auvious was done via the callback API of Genesys Cloud. A callback interaction was created in Genesys Cloud, and the agent had to answer that callback to join the room.
Now you can enable Appointments in the scheduling channel section, which uses a different approach. Scheduling is handled in Auvious instead of Genesys, and agents and supervisors can manage all appointments inside Auvious. Once the customer opens the appointment link, a web messaging interaction is created in Genesys Cloud, and the agent must answer that interaction to join the room if they open the link at the time of the appointment. If the customer opens the link before the scheduled time, they are redirected to a waiting room. You can show either a video loop or an image in the waiting room, configured in settings.
Routing
On Genesys Cloud, an appointment is routed to the assigned agent based on the user-attached data field auvious.agentUserId (or context.auvious.agentUserId if you are using WebChat) if you choose to route the interaction using an Architect flow.
Alternatively, you can route to a queue. The agent picks the queue while scheduling the call.
When scheduling appointments in Auvious, routing support depends on where the appointment is created:
- From the agent interface (Auvious UI):
- Default behavior is route to a flow (preferred-agent flow), so the appointment can target the assigned agent.
- You can switch this to route to a queue in Settings / Call Scheduling / Appointments (interaction routing configuration).
- From the widget:
- It is routed to a queue when using
chat-mode: genesys-cloud. - It is routed to a flow when using
chat-mode: genesys-web-messaging.
- It is routed to a queue when using
Use genesys-web-messaging and genesys-cloud according to your intended routing behavior (flow vs queue) in widget scheduling.
Route to a specific agent
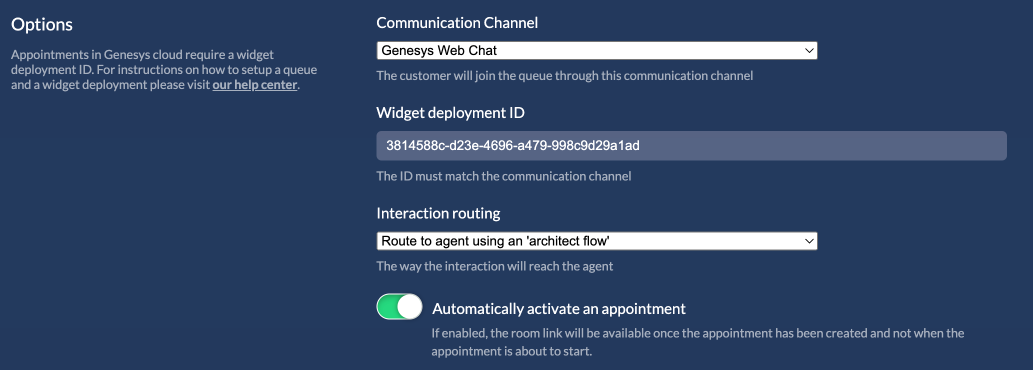
Routing to an agent requires a widget deployment ID. This is the default behavior when an agent schedules an appointment using the Auvious application. This deployment ID is used by Auvious to place the customer in queue. It is a special deployment ID because a specific flow in Architect is needed to route the customer to the agent who created the appointment. In this specific setup, interactions are routed to the assigned agent (preferred-agent flow) instead of standard queue distribution.
Instructions on how to create a flow and a widget deployment ID are provided below.
Once we have the widget deployment ID we can set it in settings.
1. Configure a queue
A queue should be configured with 'Preferred Agent Routing' as the Routing Method, and include all agents that handle video calls from appointments. 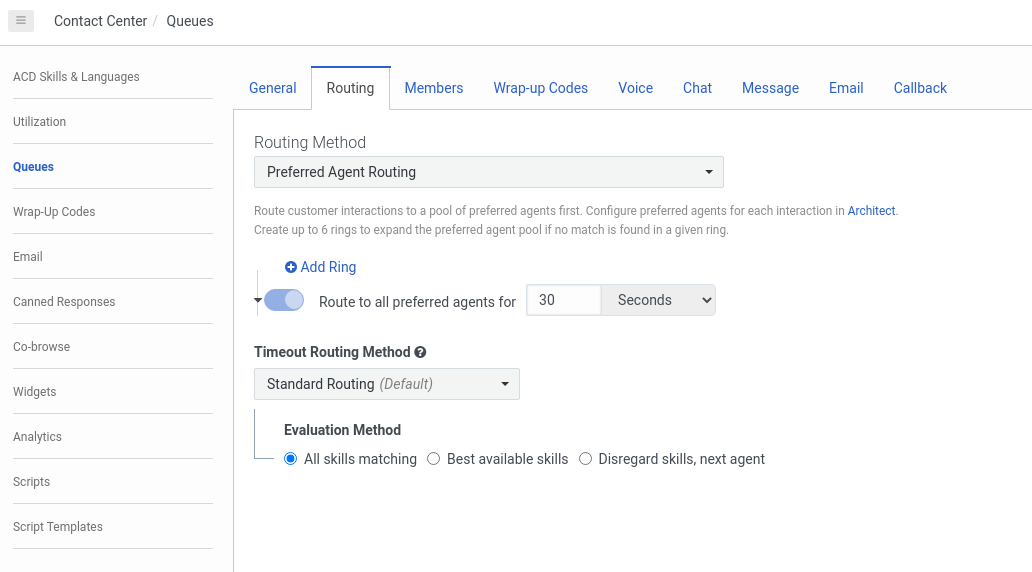 At this point, you can configure how long to try routing to the preferred (assigned) agent before timing out. You may also customize Timeout Routing Method according to your needs, or keep the default value, which falls back to 'Standard Routing' if the assigned agent does not answer within the configured timeout.
2. Configure a flow in architect
Create an Inbound Chat flow that builds a preferred-agents list with a single entry using auvious.agentUserId and a high score (for example, 100).

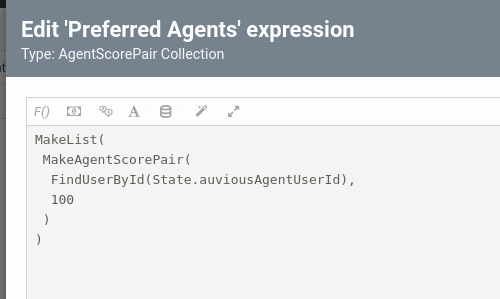
The flow shown in the pictures above consists of a 'Get Participant Data' action, which will put auvious.agentUserId into the State.auviousAgentUserId variable, and a 'Transfer to ACD' action, which will create the preferred agents list as shown in the latter picture, and route the call to the queue created at the previous step.
Steps to create the flow
- Go to Architect, under Flows select Inbound Message and click Create.
- At any point in the flow (for example at the start), click the three dots and select Toolbox -> Data -> Get Participant Data.
- On
Attribute Name 1, enterauvious.agentUserId(orcontext.auvious.agentUserIdin an Inbound Chat). - On
Variable to assign 1, enterState.auviousAgentUserId. - Close this panel and on the 3 dots select Toolbox -> Transfer to ACD
- Select the queue you would like to transfer the call to
- On the
Preferred agentsclick the arrow on the right and selectExpression. - Click the
Open large expression editor, the button that is to the left ofΣ. - Paste this
MakeList(
    MakeAgentScorePair(
        FindUserById(State.auviousAgentUserId),
        100
    )
)
- Close the panel and click
Saveon the top left - Optionally set a fallback queue on the 'Error Handling / Error Event'. Select 'Transfer to Queue' instead of Disconnect. Do this step after you have succesfully tested that the above configuration works.
- Click
Publish
If a customer is immediately redirected to a 'Thank you' page upon joining an appointment, the Architect flow is misconfigured. This causes the 'Error Event' to trigger, which — if set to 'Disconnect' — ends the session instantly.
3. Configure a widget deployment
Use a Web Messaging configuration for all active deployments.
Use genesys-web-messaging for all new integrations.
genesys-web-chat (Genesys ACD Web Chat) is retired by Genesys Cloud:
Web Messaging deployment
Create a Messenger configuration in Genesys / Admin / Messenger Configurations. You can find what options we support in the Widget - Genesys page.
Once you have created the configuration, go to Messenger Deployments and create a new deployment. Select the configuration you just created. Also select the Architect flow created above. Copy the Deployment Key.
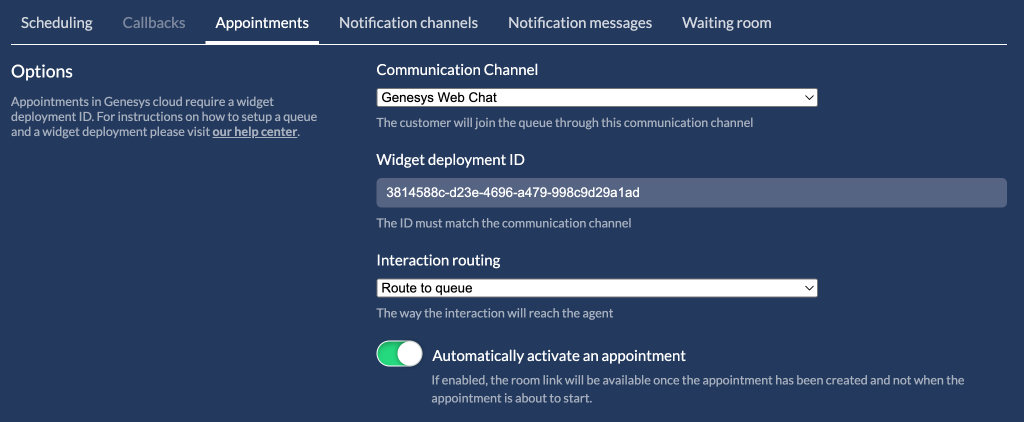
Go to Auvious / Settings / Call Scheduling, select the Appointments tab, select
Genesys Web Messagingas the communication channel, and paste the Deployment Key.
Route to a queue
Routing to a queue can be used in three scenarios:
- When an appointment is created in the widget
- When creating an appointment using the API
- When 'Interaction routing' is set to 'queue' in Settings / Call Scheduling
- For widget scheduling, queue routing applies with
chat-mode: genesys-cloud. - For API scheduling, use
interaction.routing.type: GENESYS_CLOUD_QUEUEand provideinteraction.routing.properties.queueName. - Agents can also choose the queue when creating a new appointment, or queue routing can be enforced through settings.
SMS Setup
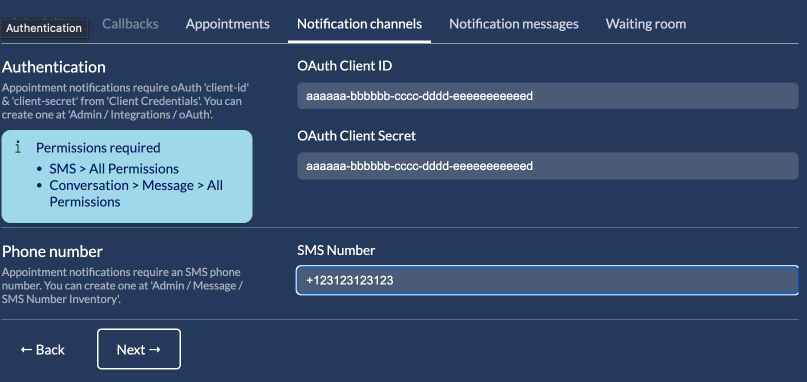
Appointment notifications in Genesys Cloud use the SMS agentless API. To use this API, you need an OAuth Client ID and Client Secret. Create a pair in Admin / Integrations / OAuth and paste it here. Don't forget to add the appropriate permissions to the Client ID
SMS:All permissionsConversation:Message:All permissions
The second and equally important step in appointment notifications is having an SMS number. These numbers can be requested directly inside Genesys Cloud. Just go to Admin / Message / SMS Number Inventory and get an SMS number.
Once you have set these values, a test flow follows. A mobile phone number is required for the service to send a One Time Password.
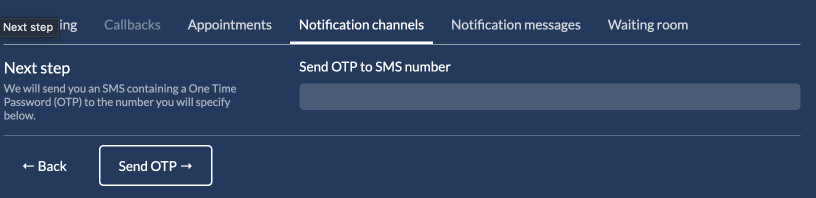
If you receive the OTP, the service works, but you also need to set it in Auvious so the test flow is complete.
Once you have verified your phone number by setting the One Time Password, click Done. Now you have successfully configured your SMS notifications. You can continue customizing the messages that the service can send.
Email Setup
Email notifications in Genesys Cloud use the Email agentless API. Similar to SMS, to use this API you need an OAuth Client ID and Secret. Do not forget to add the appropriate permissions to the Client ID.
Routing:Email:ManageConversation:Email:All permissions
Second step is to create an email Domain of type Campaign/agentless in order to support agentless email notifications. Just go to Admin / Contact Center / Email and create one following the instructions set up a domain for agentless email notifications.
The third option is what to appear as a sender. Common names are "no-reply" or something similar.
Once you have set these values, a flow similar to SMS verification follows. Enter an email address that will receive a One Time Password, which you then enter in the final step to verify that email is sent correctly.
Now you have successfully configured your email notifications. You can continue customizing the messages that the service can send.